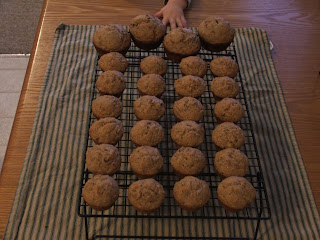
So, I have a new obsession….greek yogurt! It’s so yummy, creamy, and good for you – I love it! And since I am wildly experimental, I’ve been using it in some baking projects. I haven’t been able to use it a whole lot yet (I’m not very good at substituting things and having it work out), but there are a few things I have successfully used it in, this being one of them.
This isn't anything too original. I'm sure just about everyone has a banana bread recipe that they love. I'm still working on finding mine, but so far, this one is great. The original recipe calls for ½ cup of butter, and I really didn’t want to have to use it, so I just switched it out for greek yogurt instead, and added 1 tbsp of oil - it gives it just enough fat and moisture to be moist and dense, but they are still low-fat enough to snack on, or for a healthy breakfast.
Banana Nut Muffins
1 cup pecans or walnuts
1 ¾ cups flour (all white, or half/half with wheat)
½ cup white sugar
¼ cup brown sugar
1 tsp baking powder
¼ tsp baking soda
¼ tsp salt
1 tsp cinnamon
1/4 tsp nutmeg
1/4 tsp nutmeg
*3 large, over-ripe bananas, mashed well
2 large eggs
2/3 cup full-fat yogurt (I like to use greek)
1 tbsp vanilla
1 tbsp honey
1 tbsp canola oil
couple tbsp of milk
couple tbsp of milk
*Whenever I have some bananas that go brown before I get a chance to eat them, I will put them in a plastic bag and stick them in the freezer (thanks for showing me that, Mom!). I have about 7 or 8 of them in there right now, so I can make banana things anytime I want. Seems a little gross, but works just great =) Just thaw them out beforehand.
Preheat oven to 350 degrees
Lightly spray a baking sheet with cooking spray (see my new baking sheets from Christmas? Thanks to the in-laws ! =). Spread out nuts and lightly toast for about 8 minutes, or until you start to smell them. Watch them carefully so they don’t burn. Once done, take them out, let them cool, and then chop coarsely.
Combine dry ingredients and nuts in a large bowl. Combine wet ingredients in small bowl. Gently fold the wet into the dry, until just combined. Add some milk, a tbsp at a time, until the batter is just a little more moist. You don't want it to be runny, but not thick, either.
Divide between greased or lined muffin tins. I used my new mini-muffin tin (thanks to one of my good friends for that one =), and a few on the bigger tin.Bake for 9-15 minutes (9 for mini's, 15 for large). Do NOT over-bake, or they will dry out quickly. Test the bigger ones periodically to make sure that you don't cook them too long - 15 minutes may be too long, depending on how full you fill the tin. Remove from oven and let cool for 5 minutes. Remove from tins and finish cooling on a wire rack. Store properly to prevent them from drying out.
These muffins are SO great! Especially if you are in hurry in the morning, you could just pop it in a plastic bag and go. Cut it in half, spread on a little peanut butter on it for some more protein, grab an apple, and go! And the fat content is so low in these - they are so yummy and healthy, especially if you use wheat flour in place of some white.


