Sunday, October 2, 2011

Pumpkin Pie Fritters

I don’t know about you, but I’m ready for fall! It’s been too hot here for this pregnant lady, and I’m ready for pumpkins, and squash, and cinnamon, and apples, and well, everything fall! 

I made some pumpkin applesauce muffins last week, and while they were really yummy and healthy, they were too fall-ish for 80-degree weather. These fritters, however, worked perfectly for a nice fall evening.

Don’t be put off by the deep-frying. Ingredients-wise, these really aren’t too bad for you, and if you eat them in moderation (not like we did the first time around….), they make a really yummy fall treat. One batch makes about 20 fritters.

Pumpkin Pie Fritters

1 cup flour
2 tsp pumpkin pie spice
½ tsp salt
3 tbsp sugar
1 tsp baking powder
1 egg
1 cup pumpkin puree
vegetable oil, for deep-frying
cinnamon sugar
whipped cream

In a bowl, first combine dry ingredients.
Add egg and pumpkin and carefully blend until smooth.
While the oil heats, whip the cream and make the cinnamon sugar. We have a Fry Daddy, which works really well keeping the oil heat constant, but you could easily do it on a stovetop in a small pot. Just be carefully watching it, so it doesn’t get too hot.
Once the oil is ready, drop the batter in by spoonfuls, probably about a couple of tablespoons for one fritter. Use two spoons, one to scrape off the other into the oil, so it doesn’t splatter. 
Fry until golden brown – test the first couple, because what we thought was golden brown at first was still wet in the middle. The golden of the pumpkin makes it deceiving – they have to be a little darker than you might think they should be.
Remove with a slotted spoon and drain on paper towels. Roll in cinnamon sugar. Dip in whipped cream and eat!
We didn’t do anything too fancy to serve them, since it’s just us, but I could imagine these being really pretty served in a set of three, placed on top of caramel drizzles on a pretty plate, dolloped with whipped cream, and dusted with cinnamon. Or just scarf them down whole and eat the whipped cream with a spoon. That works, too =)

Tuesday, August 30, 2011

Sweet Chicken Stir-Fry


I like to eat. But I like to be healthy. I don’t like eating boring healthy. I still have a ways to go on getting all our meals as healthy as we need them to be, but some things will always be the same. I'm not going to make meals that are boring, just because they are healthy. And I do NOT to believe that making healthy meals means having to make fancy meals that are very time-consuming. Not that I don’t love to splurge once in a while, and take a long time to make a difficult and delicious dinner, but yummy can be easy, too. That’s my biggest beef with “easy” cooking - too often, it is easy, quick, and fatty.

We LOVE this meal. It’s easy to do, very low in fat, but it tastes indulgent and yummy. Again, I wish I could take full credit for this, but I combined a couple of different recipes, and then tweaked them to our liking. Feel free to try the originals, too. 

Sweet Chicken Stir-Fry

1 red pepper, sliced
1 cup baby carrots, sliced
1 can sliced water chestnuts
½ medium onion, sliced
1 tsp sesame oil
¼ tsp minced garlic
salt and pepper
Sauté pepper, carrots, and water chestnuts for a few minutes. Add onions, salt and pepper. Sauté for a few more minutes, then add garlic, and finish cooking until veggies are crisp-tender. Remove from the pan and set aside in a bowl. Cover to keep warm. 

¾ cup orange juice
1 tbsp cornstarch
¼ tsp ginger
2 tbsp honey
3 tbsp soy sauce

Combine all in a bowl. Set aside for later. 
1 chicken breast, cut into 1 inch chunks (as uniform as possible)
1 tbsp wheat flour
2 tbsp cornstarch
salt and pepper
ginger, paprika, cayenne, garlic powder
1 tsp sesame oil

Combine flour and cornstarch in a bowl. The cornstarch gives a good crisp coating, but combining it with some flour helps it to distribute better. Add spices to your liking.
Start the chicken only after the veggies are done. Using a spoon (and probably your fingers), distribute the coating onto the chicken. You don’t have to use it all, but make sure all the pieces are coated.
In the same sauté pan from the veggies, heat the other tsp of sesame oil over medium heat. Make sure the oil is evenly distributed around the pan. When hot, use your fingers to place all the chicken in a single layer inside. Let it cook until crisp and browned, and then turn over and do the same for the other side. Cut open the thickest pieces to check for doneness. (please excuse the next few pictures - my camera died, and the hubby's iPod didn't make my picture-taking skills any better)
Once chicken is done, add the veggies back to the pan. Pour in the sauce and stir to combine. Let it cook for a few minutes – the cornstarch in the sauce and the residue from the chicken coating will thicken the sauce.
Serve over rice. We can’t afford the empty calories of white rice, so we use brown rice. If you’re like me and making brown rice (not instant) took me many, many failed attempts, use this method. It works. And halving the recipe makes just enough for the three of us for one meal.
We didn’t have any this time, but this is awesome sprinkled with cashews. We did have green onions, which is really yummy, too.

For the prep, slice veggies and chicken earlier in the day, and keep in the fridge. Prepare flour mixture and orange juice mixture before starting any of the actual cooking. If you want to, you can even cook the rice earlier in the day, and keep in the fridge until ready for it. Just heat up the individual portions in the microwave before adding the stir-fry.

It’s healthy, tastes great, and is really easy to prepare, I promise. Please try this!

Monday, August 22, 2011

Whole Wheat Zucchini Waffles


With the kiddo’s new dietary needs, we’ve been working on trying to fit as many vegetables into our meals as possible. The one pain-in-the-butt is breakfast. Fruit is good, but it still needs to be limited for him, so I ask you: how in the world do you get a good majority of vegetables into breakfast???

Well, this recipe is a start. It’s still not a majority of vegetable (versus the other ingredients), but it’s dang good, and really healthy, too. This recipe is just a variation of the hundred’s of others like it out there on the web. I just adjusted it a bit (of course) to suit my preferences. I may try adding a little more zucchini next time, just to see if I can, and maybe some applesauce instead of some oil, but really, it’s very good for you as is.
Whole Wheat Zucchini Waffles

2 cups whole wheat flour
2 tsp baking powder
1 tsp baking soda
¼ tsp salt
2 tsp cinnamon
½ tsp ginger
pinch of nutmeg
1 tbsp brown sugar
Mix all the dry ingredients together in a large bowl.

2 small or 1 large zucchini
1 egg
1 ½ cups skim milk, divided
1 tbsp vanilla
2 tbsp oil

Wash and dry the zucchini, and chop into large coins, leaving the skins on. It really creates a nice effect, the little flecks of green that end up in the batter. Trust me.
Combine zucchini, ½ cup of milk, and the rest of the wet ingredients in a blender, and blend until smooth. You should have about 2 cups of liquid at this point.
I ended up adding at least ½ cup more milk, or more, to the batter to get the consistency I wanted for waffles. This amount of liquid wouldn’t have cut it. I would add the zucchini mixture to the dry ingredients first, and then add as much milk as you think is necessary to get a good waffle-batter consistency. Next time, I’m just going to add most of the milk straight to the blender, since I know how it turned out for me. Do what you think will work best.

Pour the wet ingredients into the dry and combine. The batter may look a little weird until you get all the milk added in, but trust me, the finished product looks great.
Using whatever measurement works best for your waffle iron, bake the waffles. Mine takes ½ cup at a time for two waffles, so we got a good 12 waffles out of this batch. Serve with butter, syrup, or fruit. Personally, we like to heat up frozen strawberries or raspberries in the microwave with a tsp or so of sugar, and then mash them up to serve over waffles. So yummy, and much better for you than syrup.
These are awesome! They taste almost like zucchini bread, but not so rich that you don’t want it for breakfast. And with the whole wheat and the zucchini, they are nice and dense, but still light enough for a good waffle. Pleeeeease try these, especially before your gardens run out of zucchini (which, from what I hear, is next to impossible…..?) =)

Sunday, August 7, 2011

Caprese Pasta Casserole


            Normally, if I was making a tomato-cream sauce, I would be all gung-ho about making it from scratch, simmering it all day, blending it in a blender, etc., but this just works so easily, that I’m okay throwing that all out the window =) This is super easy to do (apart from the chopping), and is really, really, really yummy. We love spaghetti, but this is just enough different and the same.

            This calls for cherry (or grape) tomatoes, and PLEASE don’t substitute regular! Those perfect little tomatoes have so much sweetness when they are baked, and regular tomatoes don’t cut it. Also, I have some OCD tendencies, one of them being that I can’t stomach the yucky, slimy, seed-y parts of the tomatoes, so during naptime I will literally spend half an hour squeezing all that stuff out of my teeny tiny tomato halves. But if it doesn’t bother you, please don’t take the time. I’m weird, and I know it.
Caprese Pasta Casserole

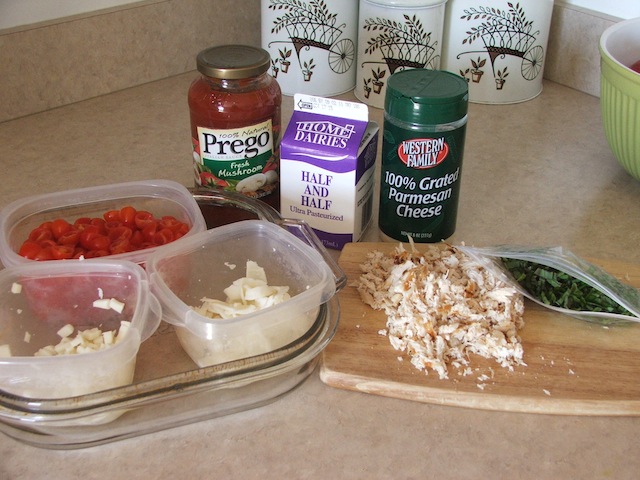
1 lb grape tomatoes, halved (and seeded, if preferred)
4 oz fresh mozzarella
1 bunch fresh basil leaves, chopped
1-2 cups cooked and shredded chicken
2 ½ cups uncooked, whole wheat pasta
1 ¼ cups your favorite tomato sauce
½ cup half and half
*1 tbsp parmesan cheese (optional)

            Sometime earlier in the day, chop (and seed?) the tomatoes. Cook and shred the chicken. Chop half of the mozzarella into very small pieces, so it will be evenly distributed throughout the dish. Slice in the other half of the mozzarella into very thin slices – these will go on top of the casserole. It doesn’t seem like much cheese, but fresh mozzarella is higher in fat, and a little goes a long way, as long as you use it wisely.

            Also chop the fresh basil leaves into small ribbons. The “official” way to do this is chiffonade, which sounds fancy, but is very easy to do and actually easier to do than just randomly chopping the leaves. Once I have the basil cut, I put it in a small plastic bag, and it will keep for a few hours before I have to use it, but it won’t last too much longer.
            Cook the pasta to the doneness you prefer. 2 ½ cups worked great for shell pasta, but if you are using penne or curly pasta, the measurements might have to be a little different to get the right amount. Experiment. 
            Once the pasta is done and drained, heat the tomato sauce in a saucepan over medium heat until it’s warm. Add the half and half and combine. Dump in the pasta, chicken, tomatoes, CHOPPED mozzarella, and the basil leaves, and stir well. 
            Pour into sprayed baking dish, and top with the SLICED mozzarella (and parmesan, if you'd like). 
           Bake for 25 minutes at 350 degrees. Remove and let sit for 5-10 minutes before serving.
            Again, not the prettiest picture, but it works =) Couple of notes: this makes about 3 meals for the three (2 ½) of us, especially if we have a salad along with it (which we always do). In my opinion, 1 lb of grape tomatoes is barely enough to get by, but I really, really like tomatoes. I’d love to try adding some cooked mushrooms to this, or maybe some other vegetables, but I haven’t done it yet. Let me know if you do!

            Don’t be put off by the fresh mozzarella and the half and half. The amounts are small enough that the fat content per serving isn’t thrown out of proportion at all. I considered using skim milk instead of the half and half, but the consistency and the flavor just isn’t the same. And 4 oz of mozzarella is the same as half a bag of pre-shredded, or 1 cup. Really not as much as it seems. If you make any other changes and they work, let me know! Enjoy!

Saturday, April 9, 2011

UPDATE: Banana Nut Muffins

Just a quick update on one of my recipes. I recently made the banana nut muffins again, but since they were so dry last time, I did a few things differently: 1) I changed and added a few ingredients, and 2) I did NOT over-bake them.

So, if you haven't tried them already, try them now! They are very healthy (as far as I have calculated), and perfect for breakfast, if you are getting sick of the cereal and milk routine (I know I am).

Let me know what you think! =)

Sunday, April 3, 2011

Cilantro Ranch Dressing


Have you ever been to one of those popular Mexican restaurants (Bajio, Café Rio, Costa Vida, etc.), and tasted the amazing cilantro ranch dressings that they have there? With very, very little trouble, I made basically the same thing. Simple, quick, low-fat, and awesome.

Most recipes call for sour cream, buttermilk, mayo, and ranch dressing mix, and are very high in fat. We have a favorite ranch dressing that we buy from a local diner-type restaurant that has all those things in it, but is also low-fat (although you’d never tell from the taste of it). I decided to use that as a base instead of buying all the ingredients separately, and it was perfect! Make as much or as little as you want, and vary the amount of the ingredients according to your preferences.
Cilantro-Ranch Dressing

1 cup buttermilk ranch dressing (use your favorite)
1 bunch of cilantro (the picture is a lot less than 1 bunch - I forgot the take the picture until I was almost done!)
1 tsp minced garlic
¼ tsp cumin
¼ tsp chili powder
1 tbsp lime juice

Wash the cilantro and separate the leaves from the stems. Discard the stems. A few stems won’t make a big difference, but too many of them blended up in there can create a weird texture.
In the blender, combine the ranch dressing, garlic, ½ of the cilantro leaves, seasonings, and lime juice. Blend thoroughly, then taste. Add more cilantro leaves, seasonings, or lime juice until you get the consistency and flavor that you like. We like a lot of cilantro and a good amount of lime juice – make it your own!

Pour into a jar or cruet and chill for an hour before serving.

We had this over southwestern-esque salads: lettuce, black beans, corn, tomato, onion, grilled chicken, a bit of cheese, avocado, and toasted tortilla strips (so easy – check out tortilla soup), and this amazing dressing on top. This will last about a week in the fridge, so we usually have this meal three times or so in that time. And since all those things are easy to have on hand in the fridge, it’s a light, easy, very yummy meal.
See my attempt at interesting food photography? FAIL.

*For a really good variation on this, add 2-3 three tomatillos (green tomato-looking thingys), husks removed, washed, and quartered, to the blender. You can also add a few stalks of chopped green onions, and a pinch of cayenne. We just like the regular version, because it’s really quick and simple, but still great-tasting. Enjoy!

Friday, March 4, 2011

Red Velvet Cupcakes

Sorry to take a while, but I’m now posting our treats from Valentine’s Day. I’ve never really been a huge fan of red velvet cake, but since it was Valentine’s, I wanted to give it a shot. The picture is awful, but they really are a bright, perfect red.

The first batch, made as is, was pretty dry, and not too great. So I used my trademark substitute for the second batch and tweaked some of the other steps of the recipe, and guess what? Perfectly moist, even after a few days. I made a quick cream cheese frosting, and these were so great after our dinner – perfectly sweet, but not too crazy rich.
Red Velvet Cupcakes

2 ½ tbsp butter, softened
¾ cup white sugar
1 ½ tbsp greek yogurt
1 egg
1 cup + 2 tbsp white flour
1 tbsp cocoa powder
½ tsp baking powder
½ tsp baking soda
¼ tsp salt
½ cup buttermilk
1 tbsp red food coloring
1 tsp vanilla
½ tsp cider vinegar

Sift together flour, cocoa powder, baking powder and soda, and salt. Set aside.

In another bowl, combine buttermilk, red food coloring, vanilla, and cider vinegar.

Cream butter with sugar until mostly incorporated. Add in greek yogurt and combine. Add egg and combine. Add in the dry and wet ingredients in batches, starting with the dry, then wet, then dry, etc., ending with the dry ingredients.

Scoop equally into a thoroughly greased or lined muffin tin. I used the entire mini-muffin tin, and then about three of the regular sized tins. This batter is pretty smooth, and more runny that it might seem is okay, but it makes it so much easier to scoop equally, and it bakes up perfectly. Bake for 9 minutes (no longer for the mini’s, but closer to 15 minutes for the regular sized cupcakes). Let cool, and remove to cooling racks to cool completely.  Once COMPLETELY cool, you can frost.

Cream Cheese Buttermilk Frosting

2 oz softened cream cheese
1 tbsp buttermilk (we happened to have it on hand, but regular milk is fine, too)
enough powdered sugar to get the right consistency (I didn’t measure, sorry)

Beat the cream cheese with the milk until smooth, then slowly add powdered sugar, beating well after each addition, until you achieve the right consistency. I wanted it pretty thick so it wouldn’t just drip off the cupcake. Do NOT add too much milk if you want a thicker frosting, or you will be adding mounds and mounds of powdered sugar.

Spoon the frosting into a quart-sized plastic bag. Squeeze out all the air, then close. Snip the tip off of one corner, not too small and not too big, to pipe the frosting through. Pipe on as much frosting on each cupcake as desired. If it’s piped on correctly, and it’s the right consistency, it shouldn’t need any additional spreading with a knife. And don’t worry about frosting each one perfectly – I kinda like it when the frosting is a little different from one to one. Sprinkle with chocolate sprinkles, or whatever kind you have. Store in a covered container.

Yummy! Not so rich that it hurts, but just the right amount of sweetness to round out the Valentine’s season. Perfect!

Saturday, February 19, 2011

Pasta Fresca knockoff

It's been a little busy, but I'm finally posting our yummy Valentine's Day dinner and dessert. Dinner today, dessert later =)

I got this recipe from my sister-in-law a while back. It’s a knockoff recipe from a restaurant, and it is sooooo yummy! It’s perfect for a date night, since it is best made in single servings. It’s not hard, but it feels fancy, and it’s quite healthy for you, too.
Pasta Fresca (for two)

2 tsp olive oil
2 cups cooked whole-wheat penne (or whatever you have) pasta
½ small onion, sliced
1 chicken breast, grilled and sliced
1 ½ cups spinach leaves
½ cup tomato, chopped
feta cheese, to taste

Just about everything for this can be done ahead of time, earlier in the day. Cook the pasta, and sprinkle a bit of olive oil over it so it doesn’t stick before storing. Slice the onions and tomatoes and store in separate containers. Cook the chicken, cool it, slice it, and store it in the fridge. Even measure out your spinach and place in a separate container. You can also get the fresca sauce ready:

Fresca Sauce:

1 cup olive oil
¼ cup balsamic vinegar
¼ cup white grape juice
½ tsp salt
2 tsp minced garlic

Combine all the ingredients in a jar. This can keep in the fridge for quite a long time without spoiling. It will solidify a bit, so if you know you are going to be making this, take the jar out in the morning so it can warm to room temperature.
When you are ready to cook, heat two pans, with 1 tsp olive oil each, over medium heat on the stove. Make sure they are up to temperature before adding one cup of pasta to each. Let the pasta heat up and then add ½ the onion to each pan. Saute, stirring frequently until onion is tender. Add ½ the chicken to each pan and heat thoroughly.
Meanwhile, place ½ the spinach in two separate bowls. Once each pasta mixture is ready, pour into the two bowls over the spinach. Spoon some of the fresca sauce (not too much!) over each bowl and combine the spinach and pasta thoroughly, adding the fresh tomatoes in the process. The heat from the pasta along with the fresca sauce will help the spinach start to wilt.
Pour into the serving dishes and top with as much feta cheese as you like. If you haven’t tried feta before, be sure to try it here. It really makes this dish what it is. And remember, a little feta goes a long way. Feta cheese will also keep in the fridge for a long time.
I wouldn’t recommend this for a date, unless you are married and already familiar with each others bad breath, and it doesn’t bother you =)

Friday, January 28, 2011

Double Chocolate Chip Cookies


These could very well be the best cookies I’ve ever made. I’ve made them only a few times before, because they are sooooo extremely addicting and awful for you. I try to save them for the times that I need to deliver treats to people, because that way I don’t feel as guilty making them. If I give most of them away, and only eat a few of them in the process, it makes it just the slightest bit easier to justify these kinds of calories.

The original recipe is best. However, I recently modified it a bit and had great success with it (in my opinion). I’ll include both, with the necessary adjustments, and you can decide on how much fat you feel like consuming today.
Double Chocolate Chip Cookies

1 cup (2 sticks) butter, melted
¾ cup white sugar
¾ cup brown sugar
2 eggs
1 tbsp vanilla
2 cups white flour
½ cup cocoa powder
1 tsp baking soda
1 cup white chocolate chips
1 cup semi-sweet chocolate chips

Combine butter and sugars in a bowl. Beat in eggs and vanilla. In a separate bowl, combine dry ingredients, minus the chips. Add the dry ingredients to the wet in three installments, mixing just until combined. Fold in chocolate chips. Chill in the fridge until firm enough to roll between your hands.

Preheat oven to 350 degrees. Line baking sheets with parchment paper. Roll desired amounts into balls and place on sheets, six to eight on a sheet, depending on the size of your baking sheets. Flatten slightly.

Bake for 12 minutes. Remove from the oven and let them cool for a bit before transferring them to cooling racks. They won’t look completely done when they come out the oven, but they firm up perfectly as they cool. Makes about 36 cookies (in my experience). These store great in the cookie jar.

Okay, so that’s the regular recipe. But since I have a really hard time wrapping my head around one entire cup of butter in one batch of cookies, I cut it back to ½ cup and did some substitutions for the rest of the fat.

Instead of the other ½ cup of butter, I mixed together ¼ cup applesauce and ¼ cup greek yogurt. I warmed the mixture slightly in the microwave before combining it with the melted butter, then beat it together with the sugars, and combined the rest of the ingredients.

This mixture still needs to chill in the fridge, but it won’t ever really roll between your hands. Just a little too sticky…
But the good news is that although the globs of batter on the sheets will look at little like poop, they still bake up beautifully =)
Bake 11-12 minutes at MOST, but maybe test a few to make sure you have the baking times right. 12 minutes may be a little too long. Let them cool completely before storing. Should also make about 36 cookies.

Now what is so awesome about greek yogurt in cookies is that it keeps them moist, chewy, and fudgy for a loooong time. So don’t store these in the cookie jar. They will get a little too moist and stick to each other, and then tear when you try to pull them apart. Not that that’s a problem, but if you want to share them with others, store them in a tupperware in between layers of parchment paper, not overlapping them. They’ll be perfect.

Sunday, January 23, 2011

Tortilla Soup


I’m coming around on the soup idea. Just the idea of soups in general. For those of you who don’t know me, I really hated soup as a kid. The idea of drinking my food was weird, and the texture was always weird…ycckkkk. But since I’ve gotten married, I’ve come across a soup recipe here and there, and I’ll admit that I’m starting to get hooked. Just starting, mind you. It’ll still be a while…=)

This soup is one of those recipes that just make you smile. It worked on the first try, leftovers were great, and it left you feeling happy inside. The kiddo scarfed it down the first time, too. He stuck up his nose at it the second time, don’t ask me why…crazy kid…
Tortilla Soup

1 small onion, finely chopped
2 peppers (red and yellow are best, but I guess green is okay), finely chopped
1 tbsp olive oil
3 cloves minced garlic
½ tsp cumin
(pinch of cayenne - we would have loved this, but left it out for the kiddo)
2 chicken breasts, chopped and seasoned with cumin, chili powder, and S&P
1 can (4 oz) green chilis, mild
1 can (15 oz) black beans, rinsed and drained
4 cups chicken broth or stock
½ cup red enchilada sauce
1/3 cup sour cream

Garnishes:
sour cream
avocado
shredded cheddar cheese
lime
fresh cilantro
toasted tortilla strips*

Sauté onions and peppers in olive oil until tender. Add garlic and spices for one minute more.  Add chicken pieces and sauté until just cooked through.

Pour in chilis, black beans, chicken broth, and enchilada sauce. Bring to a boil, then reduce heat and simmer for 30 minutes. Remove from the heat, and stir in sour cream until fully incorporated.

Serve with garnishes of your choice. We loved the avocado, cilantro, and tortilla strips the most. This made two good-sized meals for us (including the kiddo, if he would have eaten it the second time around…).

*Tortilla strips are ridiculously easy to make. Use a pizza cutter to cut up a tortilla into the size strips you want. Place them on a lightly greased baking sheet and toast in a 350 degree oven for about 5 minutes. Keep an eye on them so they get toasted enough, but not too brown. I just toasted a new one for the leftovers while the soup was reheating on the stove.

For the record, I won't be offended if you ditch my blog and follow hers instead (where I got this recipe). It's an amazing blog. I hope I can create my own recipes one day, like that.

Tuesday, January 4, 2011

Pulled Pork Sandwiches


Photographing pulled pork is like photographing sloppy joe’s – you just shouldn’t. So, sorry! No pictures today! I wasn’t going to post this, since I didn’t have any, but it really was SO good that I wanted to share.

Again, you can find many different recipes for pulled pork online. Many families have their favorite recipe that they swear by. I just found a bunch that looked good and combined them to make it my own. You can easily do the same thing.

Pulled Pork Sandwiches

*2-3 lb pork shoulder or butt
2/3 cup brown sugar
1 tbsp paprika
1 tsp ground mustard
1 tsp onion powder
½ tsp garlic powder
1 tsp chili powder
1 onion, sliced
20 oz. soda – we used Dr. Pepper, but Root Beer and Ginger Ale are also popular
18 oz. bottle favorite BBQ sauce, or homemade BBQ sauce

*We had to buy a 5 ½ lb pork shoulder, because we couldn’t find one that was smaller, so I just cut it in half and put the other half in the freezer, and we’ll have it on hand to make this again.

Combine the sugar and spices. Thoroughly rub into the pork. It won’t all stick to it, but keep as much on there as you can. Place in a large freezer bag and stick in the fridge overnight.

In the morning, remove the pork and place in a greased crockpot. Slice the onion and place all around the pork. Pour the soda over the pork and onions. Cover and cook on low for 8 hours, turning it over halfway through.

When pork is done, remove it and shred (I use a couple of forks). It should be so tender it will practically pull itself apart =) Be sure to carefully discard as much of the fat as you can. Place pulled pork into a separate bowl. Use a slotted spoon to remove the onions from the pot, and add them to the pork, if you want to. Otherwise, just throw them away. Then pour the juices from the pot into another bowl to cool down before discarding. I like doing it this way because it gets rid of as much fat as possible.

Place the pulled pork (and onions) back into the crockpot. Combine with BBQ sauce, cover, and cook on low for another hour. Serve on hamburger buns. Some people (not me) like to put coleslaw on top. Others (me) like just a little cheese melted on top. Use it however you want! Yum yum!

By the way, this made three meals for our little family, plus one meal put in the freezer for later. Yay for yummy leftovers!